当前位置:网站首页>Bear pie bearpi HM_ Micro_ Hello of small_ World
Bear pie bearpi HM_ Micro_ Hello of small_ World
2022-07-22 11:45:00 【Dandelion, let it be】
introduction
This article through a very simple program , It shows in the little bear sect BearPi-HM_Micro_Small The complete process of Hongmeng equipment development on the development board : Download the source code 、 Create a project 、 Write the source program 、 To write / Modify the compilation script 、 compile 、 burning 、 test .
Tips : Please follow 《 Build little bear pie BearPi-HM_Micro_Small Pure Ubuntu development environment 》 Build a good development environment .
This article refers to the little bear School BearPi-HM_Micro_Small Some tutorials of development board .
https://gitee.com/bearpi/bearpi-hm_micro_small
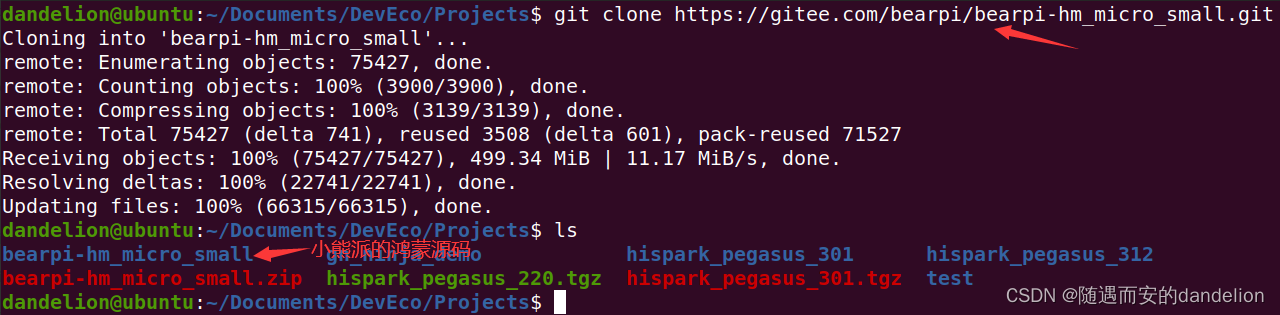
One 、 Download the source code
1、 If not installed git, Reference first 《git And gitee Quick start 》 The second part , install git.
2、 Execute the following command in the directory where you want to place the source code of Xiaoxiong pie Hongmeng , Download the source code .
git clone https://gitee.com/bearpi/bearpi-hm_micro_small.git
Two 、 Create a project
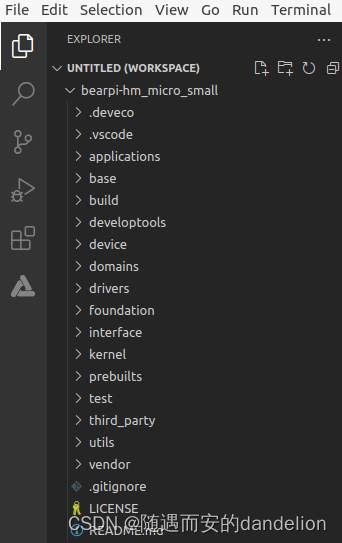
1、 open DevEco Device Tool.(1) Click... In the left toolbar DevEco Icon ;(2) single click Projects;(3) single click Import Project Button ;(4) In the pop-up window , Select the folder Projects;(5) Select project bearpi-hm_micro_small;(6) single click Import Button .

2、 In the window shown below , single click Import.

3、 In the window shown below , choice Import from OpenHarmony Source.

4、 After setting according to the following figure , single click Open.

5、 In the window shown below , choice Current Window, Open the project .

3、 ... and 、 Write the source program
1、 In path applications/BearPi/BearPi-HM_Micro/samples Next, create a new folder :dandelion.
2、 In the folder dandelion Next, create a new folder :hello_world.
3、 In the folder hello_world Next create a new file :hello_world.c, Write the source program in this file :
#include <stdio.h>

int main(int argc, char **argv)
{
    printf("\n************************************************\n");
    printf("\n\t\tHello BearPi!\n");
    printf("\n************************************************\n\n");

    return 0;
}
Four 、 To write / Modify the compilation script
1、 In the folder hello_world Next create a new file :BUILD.gn, Write the source program in this file hello_world.c Compiled script for :
executable("hello_world_exe") {
    output_name = "hello_world"
    sources = [ "hello_world.c" ]
    include_dirs = []
    defines = []
    cflags_c = []
    ldflags = []
}
executable("hello_world_exe"): Instructs the compiler to build the subsystem to complete a task named hello_world_exe Build build build “ Small target ”.executable This is it “ Small target ” type ; This “ Small target ” Specific content of : take sources Source files in the list ( That is to say hello_world.c) Compile into an executable , The name of the generated executable file is output_name Appoint , That is to say hello_world.
2、 In the folder dandelion Next create a new file :BUILD.gn.
import("//build/lite/config/component/lite_component.gni")

lite_component("dandelion_app") {
    features = [
        "hello_world:hello_world_exe",
    ]
}
lite_component("dandelion_app"): Instructs the compiler to build the subsystem to complete a type of lite_component Of 、 be known as dandelion_app Compile build target .
lite_component This type is in lite_component.gni Defined , Used to instruct the compile build subsystem to compile and build a component (Component).
at present , stay dandelion_app This compilation build target only contains hello_world Compilation build in directory “ Small target ” hello_world_exe. in other words , The components to be built here (Component) Contains only one executable program :hello_world. As for the name of this component , Is in the next file applications.json Specified in the .
3、 Open the path build/lite/components Subsystem under applications Configuration file for applications.json, Add the components that you want to compile and build to the subsystem applications In the component list of .
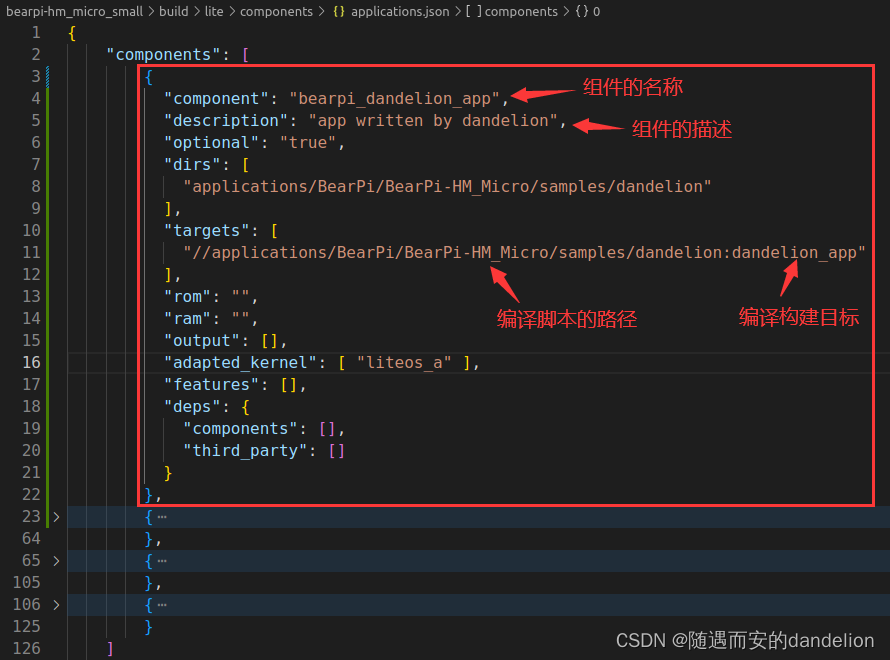
        {
          "component": "bearpi_dandelion_app",
          "description": "app written by dandelion",
          "optional": "true",
          "dirs": [
            "applications/BearPi/BearPi-HM_Micro/samples/dandelion"
          ],
          "targets": [
            "//applications/BearPi/BearPi-HM_Micro/samples/dandelion:dandelion_app"
          ],
          "rom": "",
          "ram": "",
          "output": [],
          "adapted_kernel": [ "liteos_a" ],
          "features": [],
          "deps": {
            "components": [],
            "third_party": []
          }
        },
4、 Open the path vendor/bearpi/bearpi_hm_micro Products under bearpi_hm_micro Configuration file for config.json, The components to be built before will be compiled bearpi_dandelion_app Add to subsystem applications In the component list of .

      {
        "subsystem": "applications",
        "components": [
           { "component": "bearpi_dandelion_app", "features":[] },
           { "component": "bearpi_sample_app", "features":[] },
           { "component": "bearpi_screensaver_app", "features":[] },
           { "component": "bearpi_sample_communication", "features":[] }
        ]
      },
5、 ... and 、 compile
1、 Choose products . Execute the following command at the root of the project :
hb set

As shown in the figure above , There is only one product option , So just go straight back .
2、 compile . Execute the following command at the root of the project :
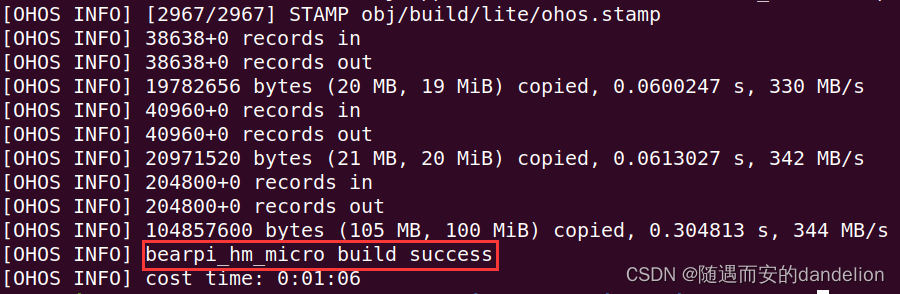
hb build -t notest --tee -f

wait for , Until the terminal appears as shown in the figure below build success word , The compilation is successful .
6、 ... and 、 burning
1、 Copy the image
After compilation , The generated image file is in the directory :out/bearpi_hm_micro/bearpi_hm_micro in , Put three image files :OHOS_Image.stm32、rootfs_vfat.img and userfs_vfat.img Copy to directory :applications/BearPi/BearPi-HM_Micro/tools/download_img/kernel in .
cp out/bearpi_hm_micro/bearpi_hm_micro/OHOS_Image.stm32 applications/BearPi/BearPi-HM_Micro/tools/download_img/kernel/
cp out/bearpi_hm_micro/bearpi_hm_micro/rootfs_vfat.img applications/BearPi/BearPi-HM_Micro/tools/download_img/kernel/
cp out/bearpi_hm_micro/bearpi_hm_micro/userfs_vfat.img applications/BearPi/BearPi-HM_Micro/tools/download_img/kernel/
2、 use USB The line connects the development board Ubuntu virtual machine .


3、 Turn the dial switch of the development board to “000” Burn mode , And click on the development board RESET Key .

4、 Double-click to open STM32CubeProgrammer; Select the interface type :USB; Click the refresh button ; single click Connect Connect the development board .

5、 After connecting , single click Open file; Select the burning configuration under the project directory tvs file , single click Open.


6、 Click on Browse Button , Then select the burning image path under the project source code , single click Open


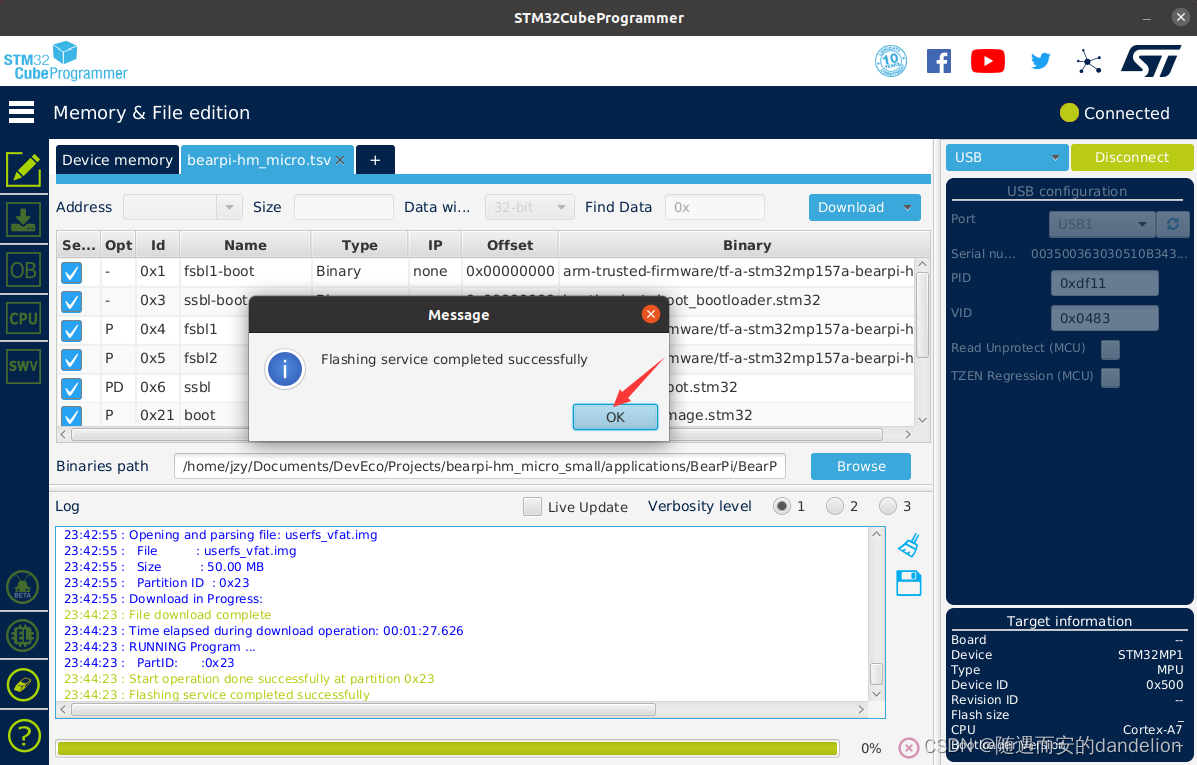
7、 Click on Download Button to start image burning , And wait for the burning to complete .


8、 After burning , In the pop-up window, click OK; close STM32CubeProgrammer.
9、 Click on DevEco Device Tool In the toolbar on the left DevEco Icon , stay “PROJECT TASKS”– Hongmeng project bearpi-hm_micro_small Next , single click Monitor Button , Open the serial terminal .

The terminal window is shown in the figure below :

10、 Turn the dial switch of the development board to “010”emmc Boot mode , And click on the development board “RESET” Button reset development board , The development board starts .

Print the startup log information in the serial port terminal .
7、 ... and 、 test
Input instructions in the serial port terminal :./bin/hello_world, And then go back , The results shown in the following figure will be displayed in the serial port terminal :

边栏推荐
猜你喜欢

Translation of multiple UAV exploration of an unknown region

Classic interview questions of interface testing: what is the difference between session, cookie and token?

(pc+wap) dream weaving template emotional information website

文件夹下搜索匹配文件或目录 glob()

Delete adjacent files with different names in the folder & adapt to the situation that the label name corresponds to the image name during neural network training

Meta: predict the potential impact of the metauniverse from the development and innovation of mobile technology

imdecode、imencode、. Tofile and fromfile read and save the file with Chinese name of Chinese path and parse and compare the result of function step by step

多线程与高并发day09

论文分享目标检测、图像分割、监督学习等

如何解决跨域问题
随机推荐
Grafana monitoring node
In depth analysis of pycocotools' installation and operation error & installation of mmcv full and mmpycocotools
nodes 簡介
How can CIOs avoid stepping on the pit in the digital transformation of B2B enterprises
J9数字论:什么是 DAO?DAO 的起源是什么
I wipe the "hidden rules" in the interview of those testers. Don't step on the pit
J9 number theory: what is Dao? What is the origin of Dao
苹果因键盘不好使赔3.4亿,SpaceX接单韦布后继者,META起诉Meta,今日更多新鲜事在此
OSPF comprehensive experiment
Why do you work as a test / development programmer? Description of all partners
Guess numbers + random numbers
Pyinstaller packaging & problem solving about enum34 & reduced version
Is the account of flush safe? How much is the Commission for opening an account at CITIC Securities
The difference between request forwarding and request redirection
Is it safe for flush to open Huatai Securities account?
【学习笔记】带你从0开始学习 01Trie
LeetCode刷题--点滴记录019
Week 5 Linear Models for Classification (Part A)
Responsive dream weaving template smart home website
Opencv & crop video into image sets with a specified frame rate