当前位置:网站首页>RDO部署Openstack 单节点
RDO部署Openstack 单节点
2022-07-19 05:13:00 【想改一个Shell命令格式的名字不让改】
本机环境
虚拟机:VMware 15 pro
系统:centos 7.6(适用7x、8x,其他版本系统自行测试)
运行内存:6GB以上
存储空间:30GB以上
注意:建议使用新安装centos (原先的centos可能会因为安装过mysql、apache等而报错)
该方式经多台机器测试完全安装成功
一、运行环境
1、节点名
修改主机名hostnamectl set-hostname “controller”
说明:openstack的部署分为单节点和多节点模式,修改主机名的方式只是为了更好的映射
2、vi /etc/sysconfig/network(有无必要待考究)
添加:HOSTNAME=controller
3、vi /etc/hosts (映射)
添加:192.168.1.1(本机ip) controller
4、关闭网络管理工具(会影响openstack的运行)
systemctl stop NetworkManager
systemctl disable NetworkManager
5、关闭防火墙
systemctl stop firewalld
systemctl disable firewalld
6.关闭selinux
Vi /etc/selinux/config
SELINUX=disabled
注:若是出现httpd启动报错请注意它的状态,selinux用上面的命令是无法永久关闭
7、设置语言环境变量
vi /etc/environment 添加
LANG=“en_US.UTF-8”
LC_ALL=”en_US.utf-8”
8、设置SSH免密登录
ssh-keygen
ssh-copy-id 192.168.1.1(本机IP)
8、reboot (让selinux配置生效)
二、安装
1、yum安装openstack相关依赖包
yum -y install http://rdo.fedorapeople.org/rdo-release.rpm(若是加载时间过长请重新运行、若是报错请更新yum(yum update -y))

yum install -y openstack-packstack
2、安装openstack
packstack --gen-answer-file /root/openstack-answer.txt(生成应答文件)

vi /root/opstack-answer.txt

修改应答文件,修改其中的内容,如下
CONFIG_CEILOMETER_INSTALL=n
CONFIG_MARIADB_PW=admin
CONFIG_KEYSTONE_DB_PW=admin
CONFIG_KEYSTONE_ADMIN_PW=admin(密码:admin 可根据英文含义判断语句意思)
CONFIG_KEYSTONE_DEMO_PW=admin
CONFIG_GLANCE_DB_PW=admin
CONFIG_GLANCE_KS_PW=admin
CONFIG_CINDER_DB_PW=admin
CONFIG_CINDER_KS_PW=admin
CONFIG_CINDER_BACKEND=nfs
CONFIG_CINDER_NFS_MOUNTS=192.168.1.1:/share
CONFIG_NOVA_DB_PW=admin
CONFIG_NOVA_KS_PW=admin
CONFIG_NEUTRON_KS_PW=admin
CONFIG_NEUTRON_DB_PW=admin
CONFIG_NEUTRON_METADATA_PW=admin
CONFIG_NEUTRON_ML2_MECHANISM_DRIVERS=linuxbridge
CONFIG_NEUTRON_L2_AGENT=linuxbridge
CONFIG_SWIFT_KS_PW=admin
CONFIG_PROVISION_DEMO=n
CONFIG_GNOCCHI_DB_PW=PW_PLACEHOLDER
CONFIG_GNOCCHI_KS_PW=PW_PLACEHOLDER
CONFIG_CEILOMETER_KS_PW=PW_PLACEHOLDER
CONFIG_AODH_KS_PW=PW_PLACEHOLDER
CONFIG_AODH_DB_PW=PW_PLACEHOLDER

运行:packstack -d --answer-file=/root/openstack-answer.txt
完全成功的标志: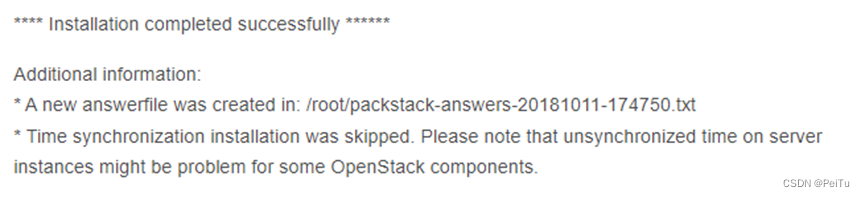
存在安装过程中报错后也能访问界面案例,不过进入界面后再调用某些功能时会出现报错 (实际根据个人pc的情况来定)
浏览器访问:http://192.168.1.1/dashboard 进行相关测试

登录账号和密码会在安装成功后生成一个文件,查看文件(cat ~/keystonerc_admin)就知道
(按照此贴安装,修改应答文件时就已经设置账号和密码为admin admin)
主要参考博客:https://blog.csdn.net/qq_25650463/article/details/114981213
边栏推荐
- 【MindSpore】【MindIR】MindSpore如何进行MindIR推理呢
- Résoudre Qt ne peut pas découvrir le plug - in de la plateforme Qt
- Differences and connections between swing transformer and vision transformer
- 基于深度学习的病理图片研究进展【含论文及其概述】
- 【 Guide de thèse】 Dag - gnn: Dag structure Learning with gnn
- mysql45讲阅读笔记深入浅出索引下(五)
- 算子Concat 拼接包含多个 tensor 的元组出错
- [cvpr2020] articles, codes and data links
- 【Mindspore】【lite端侧训练推理】Mindspore lit按照使用说明文档跑LeNet训练示例代码报错
- inception系列
猜你喜欢

论文解读《Semi-supervised Contrastive Learning for Label-efficient Medical Image Segmentation》

Uniapp wechat applet sharing and friend circle sharing function

uni-app. Develop wechat applet to realize message subscription

病理组织切片公开代码在运行过程中出现的一些错误
论文解读《TransUNet: Transformers Make Strong Encoders for Medical Image Segmentation》

Jupyter was successfully installed but cannot be used

论文解读《PScL-HDeep:基于图像的蛋白质利用集成在人体组织中的亚细胞预测定位》

RStudio作图

Differences and connections between swing transformer and vision transformer

yolov2
随机推荐
mindspore如何查看模型参数量?
有趣的torch.einsum
【CVPR2021】文章、代码和数据链接
ghostnet和efficientnet
【ICCV2021】文章、代码和数据链接
Uniapp wechat applet sharing and friend circle sharing function
【mindspore】【import erro】 undefined symbol _Z14DlogErrorInneriPK
【ECCV2020】文章、代码和数据链接
论文解读《DNA Binding Site Prediction Using a Deep Learning Method》
ssd理论
Redis详解(2)基础入门(1)安装与压测
ERROR: Failed building wheel for spams
mysql45讲阅读笔记深入浅出索引上(四)
yolov1
[cvpr2020] articles, codes and data links
[deep learning] - model comparison of emotional analysis of IMDB data set (4) - cnn-lstm integrated model
Convert the image file to Base64 through JS and compress it
yolov1
Mindspore跑model_zoo里的Bert-Thor,outputs 不合理
Crack detection of pytoch migration learning Version (resnet50)